Most women spend countless hours preparing for the arrival of their little one. Picking out names, decorating a nursery (or rearranging a one bedroom apartment, for many NYC-dwelling first time parents), taking Childbirth Education classes…and the list goes on. In the midst of all of the anticipation, preparing the pelvis for labor may go overlooked.
Somewhere around 34ish weeks, your care provider may give you the news that your baby’s head is down and that all is good to go. However, there is still more to consider in terms of the baby being in an optimal fetal position. Preparing your pelvis for labor will help get your baby in a good birthing position as well as alleviate pelvic pain.
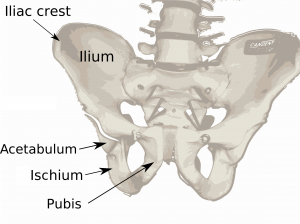
Let’s take a quick look at the pelvis:

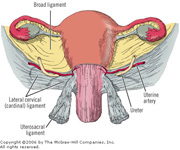
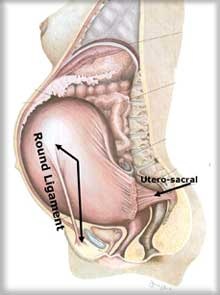
There are also many pelvic ligaments to consider. Specifically for pregnancy and birth we focus on the Broad ligament and Round ligaments. The Broad ligament is a broad fold of peritoneum supporting the uterus, extending from the uterus to the wall of the pelvis on either side (1). The Round ligaments are two cord like ligaments that attach from the pubis mons (the left and right side of the pubic bone) to the top of the uterus. They are responsible for stabilizing the uterus in a slight forward tipping position. Most women at some point experience a sharp pain caused by the round ligament as it works to stabilize the uterus when transitioning from sitting to standing or rolling over in bed (2).
 Broad Ligament
 Round Ligaments
To greatly simplify this explanation: think of the uterus as a balloon. The Broad ligament holds the uterus in alignment from the back, since it attaches to the sacrum, and the Round ligaments stabilize the front of the uterus. It is easy to see that if these ligaments are overly tight or torqued, the uterine alignment could be compromised.
It is really important to have the pelvic bones, joints and ligaments aligned since it brings balance to the uterus. This helps the baby adjust itself into an optimal birthing position with the chin tucked in the chest, leaving the smallest part of the head descending first into the pelvis. This balance can be off if there is intrauterine constraint: meaning the ligaments that are holding the uterus in place in the pelvis are asymmetric or the pelvic bones are misaligned, leaving the uterus unbalanced. This imbalance could affect the baby’s ability to move into an optimal fetal position and can narrow the birth canal. Physical Therapist Pamela Morrison adds, “We want to ensure the mother’s pelvis has the optimal biomechanics for her pelvis to fully ‘open’ to allow for the baby to descend through the pelvis. The three joints that must be aligned and mobile in the pelvis include the pubic symphysis, the sacroiliac joints, and the sacrococcygeal joint. The hip joints need to also be aligned and mobile.”
Much of the time, when a woman is experiencing pelvic pain, it is because either the pelvic joints, bones or ligaments are out of alignment. The good news is there are many ways to help combat this situation!
Pelvic Tilts
First thing to do-pelvic tilts! In yoga we refer to this as “cat/cow” and it is a staple in most prenatal yoga classes. Pelvic tilts release strained lower back muscles. They also encourage the baby into an optimal fetal position with its heaviest parts, the back and back of the head, towards the mother’s belly. Pelvic tilts also help stretch and soften the pelvic joints.

Pelvic Floor Balancing is NOT simply a Kegel
Pelvic floor Balancing is about creating balance and stability to the pelvis and pelvic floor muscles for the goal of pelvic health, a functional pelvic floor and helping the baby find optimal fetal position. Ideally the pelvic floor muscles should be springy, not too tight and not too loose. Most people when considering working the pelvic floor, think about Kegels. Kegels tend to encourage a squeezing and tightening of the urethral sphincter and will also recruit and tighten the buttocks and hamstrings This often leads to over tightening just one part of the pelvic floor and not addressing the pelvic floor as a whole. Side note- Dr. Kegel created this exercise to tone the vaginal walls, not simply a squeezing of the urethral sphincter.
The first thing to help you connect to your pelvic floor and find balance is to understand your breath and how it relates to your pelvic floor. Visualize the movements of a jelly fish, the fluid dropping and spreading then gathering and doming. That is the same image to use when thinking about the respiratory diaphragm. For proper physiological breathing, we want on the inhale for the diaphragm to drop and spread and on the exhale for it to gently lift. Now start to think of the pelvic floor mirroring that movement of the respiratory diaphragm. When you inhale the pelvic floor can stretch and length and as you exhale there is a natural doming. These two structures should move in concert.
Prenatal Yoga
Ensuring pelvic balance through the prenatal yoga practice is a priority. To do this, we include poses that help create good hip mobility, psoas stretches and poses that help release pelvic ligaments that may be overly tight or torqued. Some of these poses are baddhakonasana, “ankle to knee” pose, pigeon pose (this pose is contraindicated for moms suffering from sacroiliac pain- do “ankle to knee” instead), and ardha supta virasana. Also, many of the standard standing poses have hip “opening” elements to them, such as poses like Virabadrasana II, Trikonasana and Utthita parsvakonasana.


Seek Good Body Work!
Getting body work by a professional who specialized with the pregnant body can help remedy pelvic misalignment that can inhibit the baby from optimal fetal position. Some options are Chiropractic (specifically the Webster Technique), Craniosacral Therapy, myofasical release techniques, acupuncture and Physical Therapy.
Get off the couch!
Bad posture for mom equals bad position for baby! Even though flopping down on the couch sounds like a great idea at the end of a busy day, it is not particularly helpful for your baby. Constantly slumping in your daily posture adds to imbalance in the pelvis. This weakens some muscles and will over tighten others. Also be aware of how you stand; many people sit into one hip while they stand which can torque the pelvic bones and joints. To avoid what I have dubbed “slumpasana” try sitting on a birth ball, straddle a chair, get on all 4’s or side lie on the couch. When standing, take notice of your postural natural habits. It is very common for the pregnant body to develop a sway-backed posture which then pushes the chin forward. Start from the bottom and work your way up. Make sure your feet are both pointed forward, knees unlocked and not pushing back, pelvis in a natural anterior tip while slightly anchoring the tailbone, armpit chest lifted, shoulder blades releasing down the back and sides of the neck equally lengthening up. Remember to breathe while in your new corrected posture!
So here you have it! A few new habits and ideas you can integrate into your daily life that will hopefully make the birth of your baby quicker and more efficient. Truthfully- who doesn’t want a quicker labor?!
On a personal note: I have made a vow that, for my next pregnancy, I am going to follow this list to a tee! Truth be told- even though I teach this information, I was not the best student myself. In hindsight, I see some of the mistakes I made along the way that led to my 42 hour labor. I stuck with my pregnancy “spinning” routine for too long, and that tightened my psoas and torqued my pelvis. You can be sure that when it is time for baby number two, I will leave the spin bike behind for a while and have a standing appointment with my Physical Therapist to make sure my pelvis is aligned and that baby has the best opportunity to find its optimal position.
Happy birthing everyone!
Sources
1 http://medical-dictionary.thefreedictionary.com/broad+ligament
2. http://emedicine.medscape.com/article/275773-overview
Photo Credits
1. http://birthwithoutfearblog.com/2012/07/10/how-the-webster-technique-can-help-you-birth-without-fear/
2. http://birthwithoutfearblog.com/2012/07/10/how-the-webster-technique-can-help-you-birth-without-fear/
3. http://www.yogajournal.com/practice/2114


